博客 V2
终于又抽出来一点时间来翻修自己的博客,现在它已经有一个基本的形状了。
新博客丢掉了 Typecho 换成 Next.js 从头搭建个人主页。毕竟 GCP 每个月出站流量也是 💰,而且我终于可以用上全村最骚的前端技术自由发挥定制博客了。
SSG!
静态生成整个站点,整个主页和全部博客内容都在构建时处理完成,这样就可以直接部署到 Cloudflare Pages 这样的静态站托管平台了还不收钱。
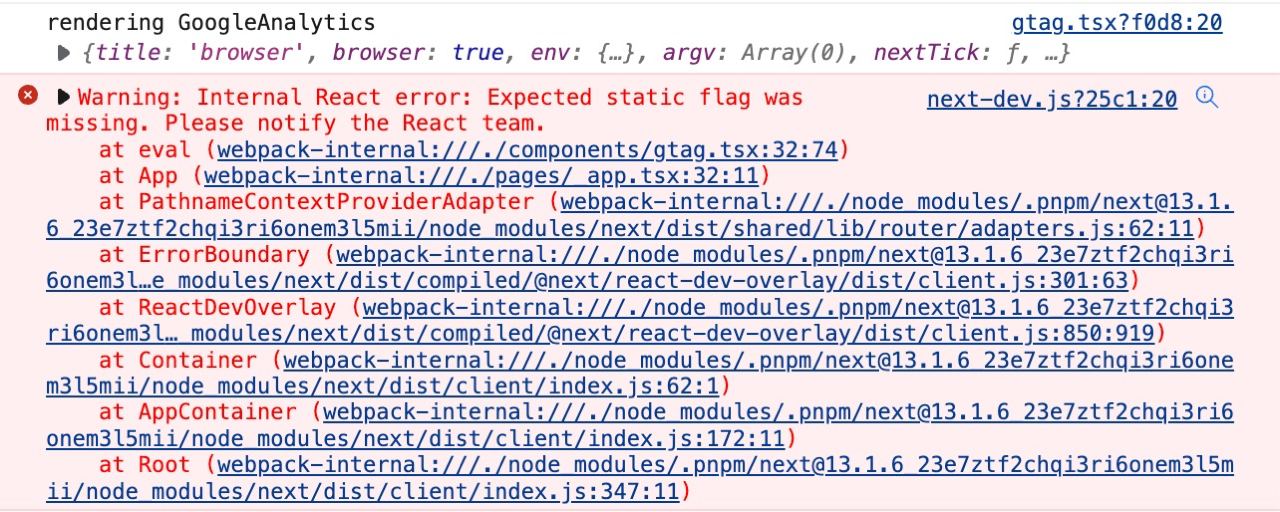
可这前端技术实在发展太快,明明也才一年多没仔细关注前端发展,什么按需水合、什么岛屿架构把我的心智击穿又击穿。 特别是脱水(dehydration)和水合(hydration),再加上 Next.js 默认会给塞一些 node 模块的 polyfill,一段代码在两边跑两遍会发生一些不可名状的事情,有时候还会出莫名其妙的 hydration error:

我选择放弃治疗,只要能渲染不崩就行(
自己编写 markdown 主题
自己写主题就可以用上一些潮流的 CSS 特性,比如 :has() pseudo class,这个特性 Chrome 五个月前刚刚 ship,用它可以做出来精致的嵌套 quote 效果
Blockquotes can also be nested...
...by using additional greater-than signs right next to each other...
...or with spaces between arrows.
Blockquotes can also be nested...
...by using additional greater-than signs right next to each other...
and return to last block

以及手搓出来的更好看的代码块,支持文件名、行号以及高亮特定关键词。使用了 rehype-pretty-code,需要自己编写高亮和行号样式。搬运之前的博客的时候把代码块样式也重构了一下,比如VSCode 黑魔法探秘之插件加载机制这篇的代码块都加上了对应的高亮。
import { defineDocumentType, makeSource } from './lib/contentLayerAdapter'
import remarkParse from 'remark-parse'
import remarkGfm from 'remark-gfm'
// @ts-ignore
import remarkDirective from 'remark-directive'
import remarkMath from 'remark-math'
import rehypeMath from 'rehype-katex'
import rehypeHighlight from 'rehype-highlight'
import rehypeMinify from 'rehype-preset-minify'

export const Post = defineDocumentType(() => ({
  name: 'Post',
  filePathPattern: `documents/posts/**/*.mdx`,
  contentType: 'mdx',
  fields: {
    title: {
      type: 'string',
      required: true,
    },
  computedFields: {
    path: {
      type: 'string',
      resolve: (post) => `/posts/${post.slug || post._raw.flattenedPath}`,
    },
  },
}))

export default makeSource({
  contentDirPath: 'documents/posts',
  documentTypes: [Post],
  mdx: {
    remarkPlugins: [remarkParse, remarkMath, remarkGfm, remarkDirective],
    rehypePlugins: [[rehypeMath, { throwOnError: true, strict: true }], rehypeHighlight, rehypeMinify],
  },
})import { defineDocumentType, makeSource } from './lib/contentLayerAdapter'
import remarkParse from 'remark-parse'
import remarkGfm from 'remark-gfm'
// @ts-ignore
import remarkDirective from 'remark-directive'
import remarkMath from 'remark-math'
import rehypeMath from 'rehype-katex'
import rehypeHighlight from 'rehype-highlight'
import rehypeMinify from 'rehype-preset-minify'
export const Post = defineDocumentType(() => ({
name: 'Post',
filePathPattern: `documents/posts/**/*.mdx`,
contentType: 'mdx',
fields: {
title: {
type: 'string',
required: true,
},
computedFields: {
path: {
type: 'string',
resolve: (post) => `/posts/${post.slug || post._raw.flattenedPath}`,
},
},
}))
export default makeSource({
contentDirPath: 'documents/posts',
documentTypes: [Post],
mdx: {
remarkPlugins: [remarkParse, remarkMath, remarkGfm, remarkDirective],
rehypePlugins: [[rehypeMath, { throwOnError: true, strict: true }], rehypeHighlight, rehypeMinify],
},
})当然还有公式支持:
假設有 與 兩個範疇,而函子 是 與 之間的映射
- 範疇中的每個 object 都與 範疇之中每個 相關聯
- 將 中的每個 morphism 映射到 中的 morphism 並且滿足以下兩個條件:
- 對於 中的每個 ,
- 對於 中的 和 等所有 morphism ,
暗色模式只会遵循浏览器/系统设置(
加密文章
由于这是个 SSG 的纯静态站,给文章上密码没有办法后端校验,唯一的方法是真·加密。幸好技术选型的时候文章是通过 Contantlayer 处理一遍,生成文章内容的 React 组件(一段 JS 脚本)之后再交给 Next.js 渲染的,文章内容和页面布局组件是解耦的,可以对文章内容单独加密,在布局组件中解密,成功后再渲染。
加密解密都用 AES-CBC,iv 跟文章内容存放在一起,十分地简单。不要问我为什么加解密用的不是同一个 crypto,那是来自 hydration 的爱
import nodeCrypto from 'crypto'

async function aesKeyFromString(crypto: SubtleCrypto, key: string, alg: AesCbcParams) {
  const ek = new TextEncoder().encode(key)
  const hash = await crypto.digest('SHA-256', ek)

  return await crypto.importKey('raw', hash, alg, true, ['encrypt', 'decrypt'])
}

// encryption on server side(build time)
export async function encrypt(text: string, password: string) {
  const iv = nodeCrypto.getRandomValues(new Uint8Array(16))
  const alg = { name: 'AES-CBC', iv } satisfies AesCbcParams
  const key = await aesKeyFromString(nodeCrypto.subtle, password, alg)

  const data = new TextEncoder().encode(text)
  const buf = await nodeCrypto.subtle.encrypt(alg, key, data)

  return [Buffer.from(iv).toString('base64'), Buffer.from(buf).toString('base64')] as const
}

// decryption on client side(runtime)
export async function decrypt(text: string, password: string, ivStr: string) {
  const iv = Buffer.from(ivStr, 'base64')
  const alg = { name: 'AES-CBC', iv: iv } satisfies AesCbcParams

  const key = await aesKeyFromString(crypto.subtle, password, alg)
  const cipher = Buffer.from(text, 'base64')
  try {
    const plain = await crypto.subtle.decrypt(alg, key, cipher)
    return new TextDecoder().decode(plain)
  } catch (e) {
    console.error(e)
    return undefined
  }
}
import nodeCrypto from 'crypto'
async function aesKeyFromString(crypto: SubtleCrypto, key: string, alg: AesCbcParams) {
const ek = new TextEncoder().encode(key)
const hash = await crypto.digest('SHA-256', ek)
return await crypto.importKey('raw', hash, alg, true, ['encrypt', 'decrypt'])
}
// encryption on server side(build time)
export async function encrypt(text: string, password: string) {
const iv = nodeCrypto.getRandomValues(new Uint8Array(16))
const alg = { name: 'AES-CBC', iv } satisfies AesCbcParams
const key = await aesKeyFromString(nodeCrypto.subtle, password, alg)
const data = new TextEncoder().encode(text)
const buf = await nodeCrypto.subtle.encrypt(alg, key, data)
return [Buffer.from(iv).toString('base64'), Buffer.from(buf).toString('base64')] as const
}
// decryption on client side(runtime)
export async function decrypt(text: string, password: string, ivStr: string) {
const iv = Buffer.from(ivStr, 'base64')
const alg = { name: 'AES-CBC', iv: iv } satisfies AesCbcParams
const key = await aesKeyFromString(crypto.subtle, password, alg)
const cipher = Buffer.from(text, 'base64')
try {
const plain = await crypto.subtle.decrypt(alg, key, cipher)
return new TextDecoder().decode(plain)
} catch (e) {
console.error(e)
return undefined
}
}實作效果見 世界は豊かに、そして美しく,當然密碼只能猜猜咯?
Test Password 密碼是 test
更快的加载速度
你可能会注意到页面加载速度变快了很多 🚀
事 CDN,你换了 CDN!
的确是这样的,我把字体换成了饿了么的 CDN(谢谢他们的 npm CDN 镜像),现在加载 webfont 的 css 文件只需要不到 100ms,按需加载一个字体块也只要 300-400ms。另外 Next 自带了很多优化,比如 split chunk, tree shaking,再也不用操心那团混乱的 webpack 配置。
除去上面的优化,新的主页还加入了 Service Worker 支持,workbox 的 precache 功能可以预先缓存一些公用静态资源,在页面间跳转的时候就不需要再从网络上获取,直接使用本地缓存就会显得非常快。
现在页面打开速度和国内网页差不多,唯一拉垮的地方就是 CF Pages 的国内延迟非常烂,即使页面的主要内容只需要 100ms 不到就可以渲染出来 TTFB 也还是需要 1.2-1.5s 左右。
Next?
博客文章还没有搬运完,由于每篇文章都是手动搬运的剩下的大部分都是互联网垃圾,所以进度会非常慢;文章也需要一个评论系统,或许会接入一个现成的吧当然是自己搓啦。
还有一些细节正在施工中 🚧。
祝元宵快乐 🎇
--UPDATE--
可以发布评论了
當然是使用了 CF Workers+KV(